|
Disclaimer
I decided to write this instructions as I was looking for one but unsuccessfully. There was a number of questions and request for instructions and videos, but no answer. So here is my attempt. Folks, this is how I did replace my screen. This is not howit should be done professionally. Or at least I don’t know that. This is mystory of successful replacement. It may include unnecessary steps or somethingnot done as it should be, but final effect is that I got my screen replaced andphone works as a treat.
So please feel free to comments re how to simplify it, howto make it better, but I bear no responsibility if you brick or break yourdevice.
I removed all components from the phone leaving bare backplane and the screen, as I was afraid to break anything in the process.However, as the screen is glued to the other side of the backplane than all theinternal components, I’m not sure if this is at all required. You may get awaywith removing screen connectors only (and maybe unclipping battery). Your call.
Initial status: Phone dropped, screen cracked and part of the screenunusable – not responding to touch.
Steps:
1. Power off your phone
2. Remove sim/sd card tray
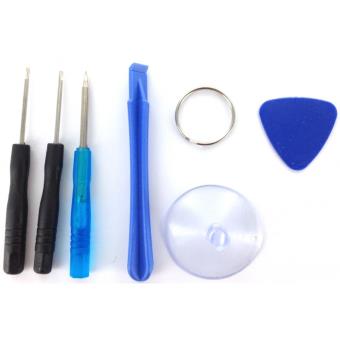
3. Unscrew two screws on both sides of USB port with screwdriver received with spare part
4. First difficult bit. Remove the phone from its frame. Provided suction cup is not strong enough, so you need to fiddle a bit with these blue pads or flat but not too sharp something to leverage it somehow. It took me 15 minutes to open it, so be patient. You may see similar video (scroll down to step 10 for link) but of course you don't need hair dryer for this part. I refer only to suction cup and blue thingy here. Very similar process. At the end, here is what you will get:

5. Now, you got it open. First bit is to remove battery, to cut off power.
a. Unscrew 3 screws just above battery, remove metal bar and unclip battery connector (see picture below) Note that one of the screws has a sticker. This is your last chance to back off and keep waranty!
b. (Optional – see 6.) Remove battery from phone. There is plastic sticky foil wrapping battery with a non-sticky flap on top, that you can grab and pull battery out. Then tear battery away from sticky foil, but leave that foil in place for future
6. Unscrew the black screw and remove metal L shaped piece covering 2 ribbon connectors, one narrower Lego type, and second, wider, latch type. The second connector is kept in place with grey sticky tape. Keep it for later. Now, if you only want to remove screen without whole parts, you may skip following steps jumping straight to 10.
7. Now remove all remaining connectors and elements from system board

a. Buttons connector – small ribbon tape and latch connector
b. Main ribbon connector under battery plus little round one
c. Unscrew metal cover under LED and remove connector to laser focus and remove it. d. Vibrator (round thing) is glued with sticky bottom to the board, tear it away gently and remember it is black side up.
8. Now you can unscrew and remove system board
9. Now, down to the lower part.
a. Unscrew 7 screws to remove plastic cover - see first overview pic.
b. Disconnect 2 ribbon connectors and one round one
c. Unscrew 2 screws and you got USB power board removed
d. Push out middle button (fingerprint scanner)
10. Now, you got the grey board empty,

so there is just screen glued to it on the other side. It’s glued on ends only – under buttons and cameras. No glue in the central part of the screen. This is second difficult and dirty part (first was removing board from the frame). Depending how badly you broke your screen, you may use cracks or, as I did, try from the middle of the screen. Just remember old screen is broken anyway and you WILL break it further in the process. Try to break screen, not frame. You need to use flat knife, or these blue tools to push it out. This is dirty bit, with plenty of broken glass etc. The old screen is going to waste anyway. Once main screen is removed, clear all debris from all corners. I used flat screwdriver to remove remaining patches of old glue. You may try to heat it up with hair dryer as MarcinP suggested in his post - https://www.youtube.com/watch?v=f77QGIrbSEo&app=desktop (Kudos Marcin!)
11. Once cleared all debris you may start putting new screen in. Don’t remove protecting foil just yet. Start with putting two connectors through the narrow hole in the frame. Try few times putting screen in place. Don’t worry, you will be able to remove it easily unless it’s glued. Get familiar with the process to put it in place quickly once you applied glue, to avoid any mistakes. Note where connectors go in the pic below.

12. Once you are familiar with the process, put few drops of super glue on both top and bottom sides of the FRAME, then put screen down in place and press firmly. Make sure ribbon connectors are in place, pulled through the hole. I flipped the screen face down to press it firmly to let glue to set. Here is where I put my super glue (red dots)

13. Now, you have empty frame with new screen glued in. Congrats. Half way through. :-)
14. Push the fingerprint sensor back into place and you can start putting all connector back in. The order is not really important. You may follow points 7,8,9 in reverse order. Make sure that 2 latch ribbon connectors (buttons and screen) are tucked in firmly. There is white line on both of them so they need to go in up to that line. The wide screen ribbon connector port got a flap that keeps it in place. Push it up with flat screwdriver to open it before you push the ribbon in place and close/lock it afterward. Don’t forget yellow sticky foil to keep it in place.
15. Make sure you put these little rubbers from around the flash and at the bottom back into place. 16. Once you put all elements and connector back in place, put battery back in. Wrap it with sticky foil, push in and connect and screw in the bar holding it in place.
17. Now, the whole phone is assembled, last task is to put it back into the frame
18. Make sure you put this little rubber back into LED cover (picture above)
19. Put side buttons back into place.
20. Put phone back into frame and press firmly. Start with top of the phone, then slid bottom back in place to make sure these little clips are in place. To avoid buttons falling out, you may try to hold phone at some angle with buttons facing down
21. Screw 2 screws in at the bottom
22. Put sim and sd card tray back in
Good luck
| 
 [Copy link]

 Peep Card
 Radar card
 Post time 2017-7-3 18:25:55


 Riser card
 Top Cards
 Silent card
 Noise card
 Highlight card
 Jack
Jack Magic mirror


 Post time 2017-7-4 04:55:21
 Author